
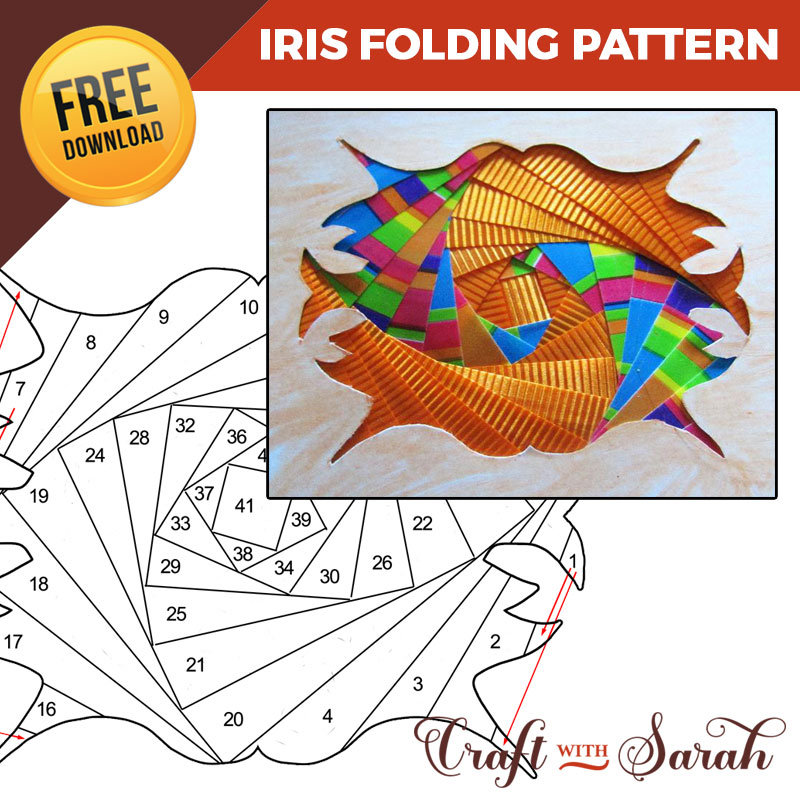
Discover a wonderfully unique and captivating way to create handmade holiday greetings this year with Iris Folding Christmas Cards Templates. This paper craft technique, which involves layering folded strips of colored paper within an aperture, produces a stunning spiral design that resembles the iris of a camera lens. It's a method that looks incredibly intricate and complex, but is surprisingly simple and meditative once you understand the basic steps. The beauty of iris folding is its ability to transform simple paper into a piece of art with incredible depth and texture, making it perfect for crafting memorable Christmas cards that friends and family will cherish.
Whether you are a seasoned paper crafter looking for a new challenge or a complete beginner eager to try your hand at something creative, iris folding is an accessible and rewarding hobby. The process is guided entirely by a numbered template, taking all the guesswork out of where to place each strip of paper. This makes it a fantastic project for a cozy winter afternoon, allowing you to relax and focus on the rhythmic process of folding and taping. The result is a professional-looking card that carries the special, personal touch of being handmade.

This comprehensive guide will walk you through everything you need to know to get started. We will cover the essential supplies, provide a clear step-by-step tutorial, and explore a variety of festive templates you can use, from classic Christmas trees and baubles to charming snowmen and elegant snowflakes. You'll learn expert tips for choosing paper, creating beautiful color combinations, and adding those perfect finishing touches. Get ready to unlock your creativity and send the most stunning Christmas cards this season.

What is Iris Folding? A Quick Guide for Beginners
Iris folding is a paper craft technique with origins in 20th-century Holland. It involves arranging and layering folded strips of paper or fabric in a spiral pattern, guided by a template placed underneath an aperture cut into a piece of cardstock. As you work from the outside in, following the numbered sequence on the pattern, the layered strips create a design that mimics the look of a camera's iris or shutter—hence the name "iris folding."
The core components of the technique are the template, the aperture, and the paper strips. The template is the roadmap, with numbered sections indicating where each colored strip should be placed. The aperture is the "window" cut into your main card, which will frame your finished design. The folded paper strips are the building blocks that create the vibrant, spiraling pattern.

What makes this craft so appealing, especially for card making, is its ability to produce a sophisticated and textured result with minimal tools and a straightforward process. It's a fantastic way to use up scraps of wrapping paper, old magazines, or patterned craft paper, turning potential waste into a beautiful focal point for your projects. The repetitive nature of folding and placing the strips is often described as relaxing and almost therapeutic, making it an ideal craft for unwinding during the busy holiday season.
Essential Supplies for Your Iris Folding Project
Before you dive into creating your beautiful Christmas cards, it's helpful to gather a few essential supplies. The good news is that you likely already have many of these items in your home or craft stash.
Paper: The Heart of Your Design
The paper you choose will define the look and feel of your finished card. Lighter-weight paper is generally easier to fold and work with.
* Patterned Paper: Scrapbooking paper, origami paper, or even high-quality gift wrap works wonderfully. The patterns add extra visual interest.
* Solid Color Paper: Use construction paper or colored copy paper for a more graphic, bold look. Combining different shades of the same color can create a beautiful ombre effect.
* Recycled Materials: Old envelopes with security patterns, pages from magazines, or even foil candy wrappers can be upcycled for unique and eco-friendly designs.
* Cardstock: You'll need a sturdy piece of cardstock (at least 65 lb / 176 gsm) for the front of your card, into which you will cut the aperture.

Tools of the Trade
Precision and neatness are key in iris folding, and the right tools make all the difference.
* Iris Folding Template: This is the most crucial item. You can find countless free templates online to print.
* Craft Knife and Cutting Mat: A sharp craft knife (like an X-ACTO knife) is essential for cutting a clean aperture in your cardstock. Always use a self-healing cutting mat to protect your work surface.
* Scissors: A good pair of scissors is needed for cutting your paper strips.
* Tape: Clear tape (like Scotch tape) is used to secure the paper strips to the back of your card. A low-tack tape, like washi tape or painter's tape, is also useful for temporarily holding your template in place.
* Ruler: A clear ruler helps with measuring and cutting straight paper strips.
* Bone Folder: While not strictly necessary, a bone folder creates crisp, sharp folds in your paper strips, giving your finished project a more professional look.

How to Use Iris Folding Christmas Cards Templates: A Step-by-Step Guide
Once you have your supplies and have chosen a template, you're ready to begin. The process is the same regardless of the design you choose. Let's walk through it step-by-step.

Prepare Your Card Front: Start with your piece of cardstock. Trace the outline of the aperture shape from your chosen template onto the front of the cardstock. Using a craft knife and cutting mat, carefully cut out the shape to create your window.

Secure the Template: Turn the cardstock over so you are looking at the back. Place your printed iris folding template on your work surface, facing up. Position your cardstock (back side up) over the template so that the aperture is perfectly aligned with the pattern outline. Secure the cardstock to the template with a few pieces of low-tack tape. You should be able to see the numbered pattern clearly through the window.
Prepare Your Paper Strips: Cut your chosen papers into strips. A good starting width is around 1 to 1.5 inches (2.5 to 4 cm). The length doesn't need to be exact, as you'll trim them later. Fold each strip in half lengthwise. A bone folder will help you get a sharp crease.

Follow the Numbered Pattern: Now for the fun part! Look for the number "1" on the template through your aperture. Take your first folded paper strip. Align the folded edge of the strip along the line that separates section 1 from the center "iris." The strip should completely cover the area of section 1. Tape both ends of the strip securely to the back of the cardstock.

Continue Layering: Find section "2" on your template. Place your next folded strip so the folded edge covers the line between section 2 and the center. Tape it down. Continue this process, following the numbers in sequence (3, 4, 5, and so on). Each new strip will slightly overlap the previous one. You can use different colors for different sections as indicated on your template, or create your own color scheme.
Fill the Iris: Once you have covered all the numbered sections, you'll be left with a small opening in the middle—the iris. Cut a small piece of special paper (holographic, glitter, or a contrasting solid color works well) and tape it over this central opening to complete the design.

The Big Reveal: Carefully remove the low-tack tape and lift your cardstock off the template. Turn it over to the front to see your beautiful, finished iris folding design! To give it a clean finish, you can glue a piece of backing paper or the other half of your folded card over the taped back side.


Free Printable Iris Folding Christmas Cards Templates
The heart of this craft lies in the patterns, and luckily, the internet is filled with free printable Iris Folding Christmas Cards Templates to suit every style. When searching for templates, look for clear, well-numbered designs. Here are some of the most popular themes to get you started.
Classic Christmas Shapes
These timeless designs are perfect for traditional holiday cards and are often great patterns for beginners.
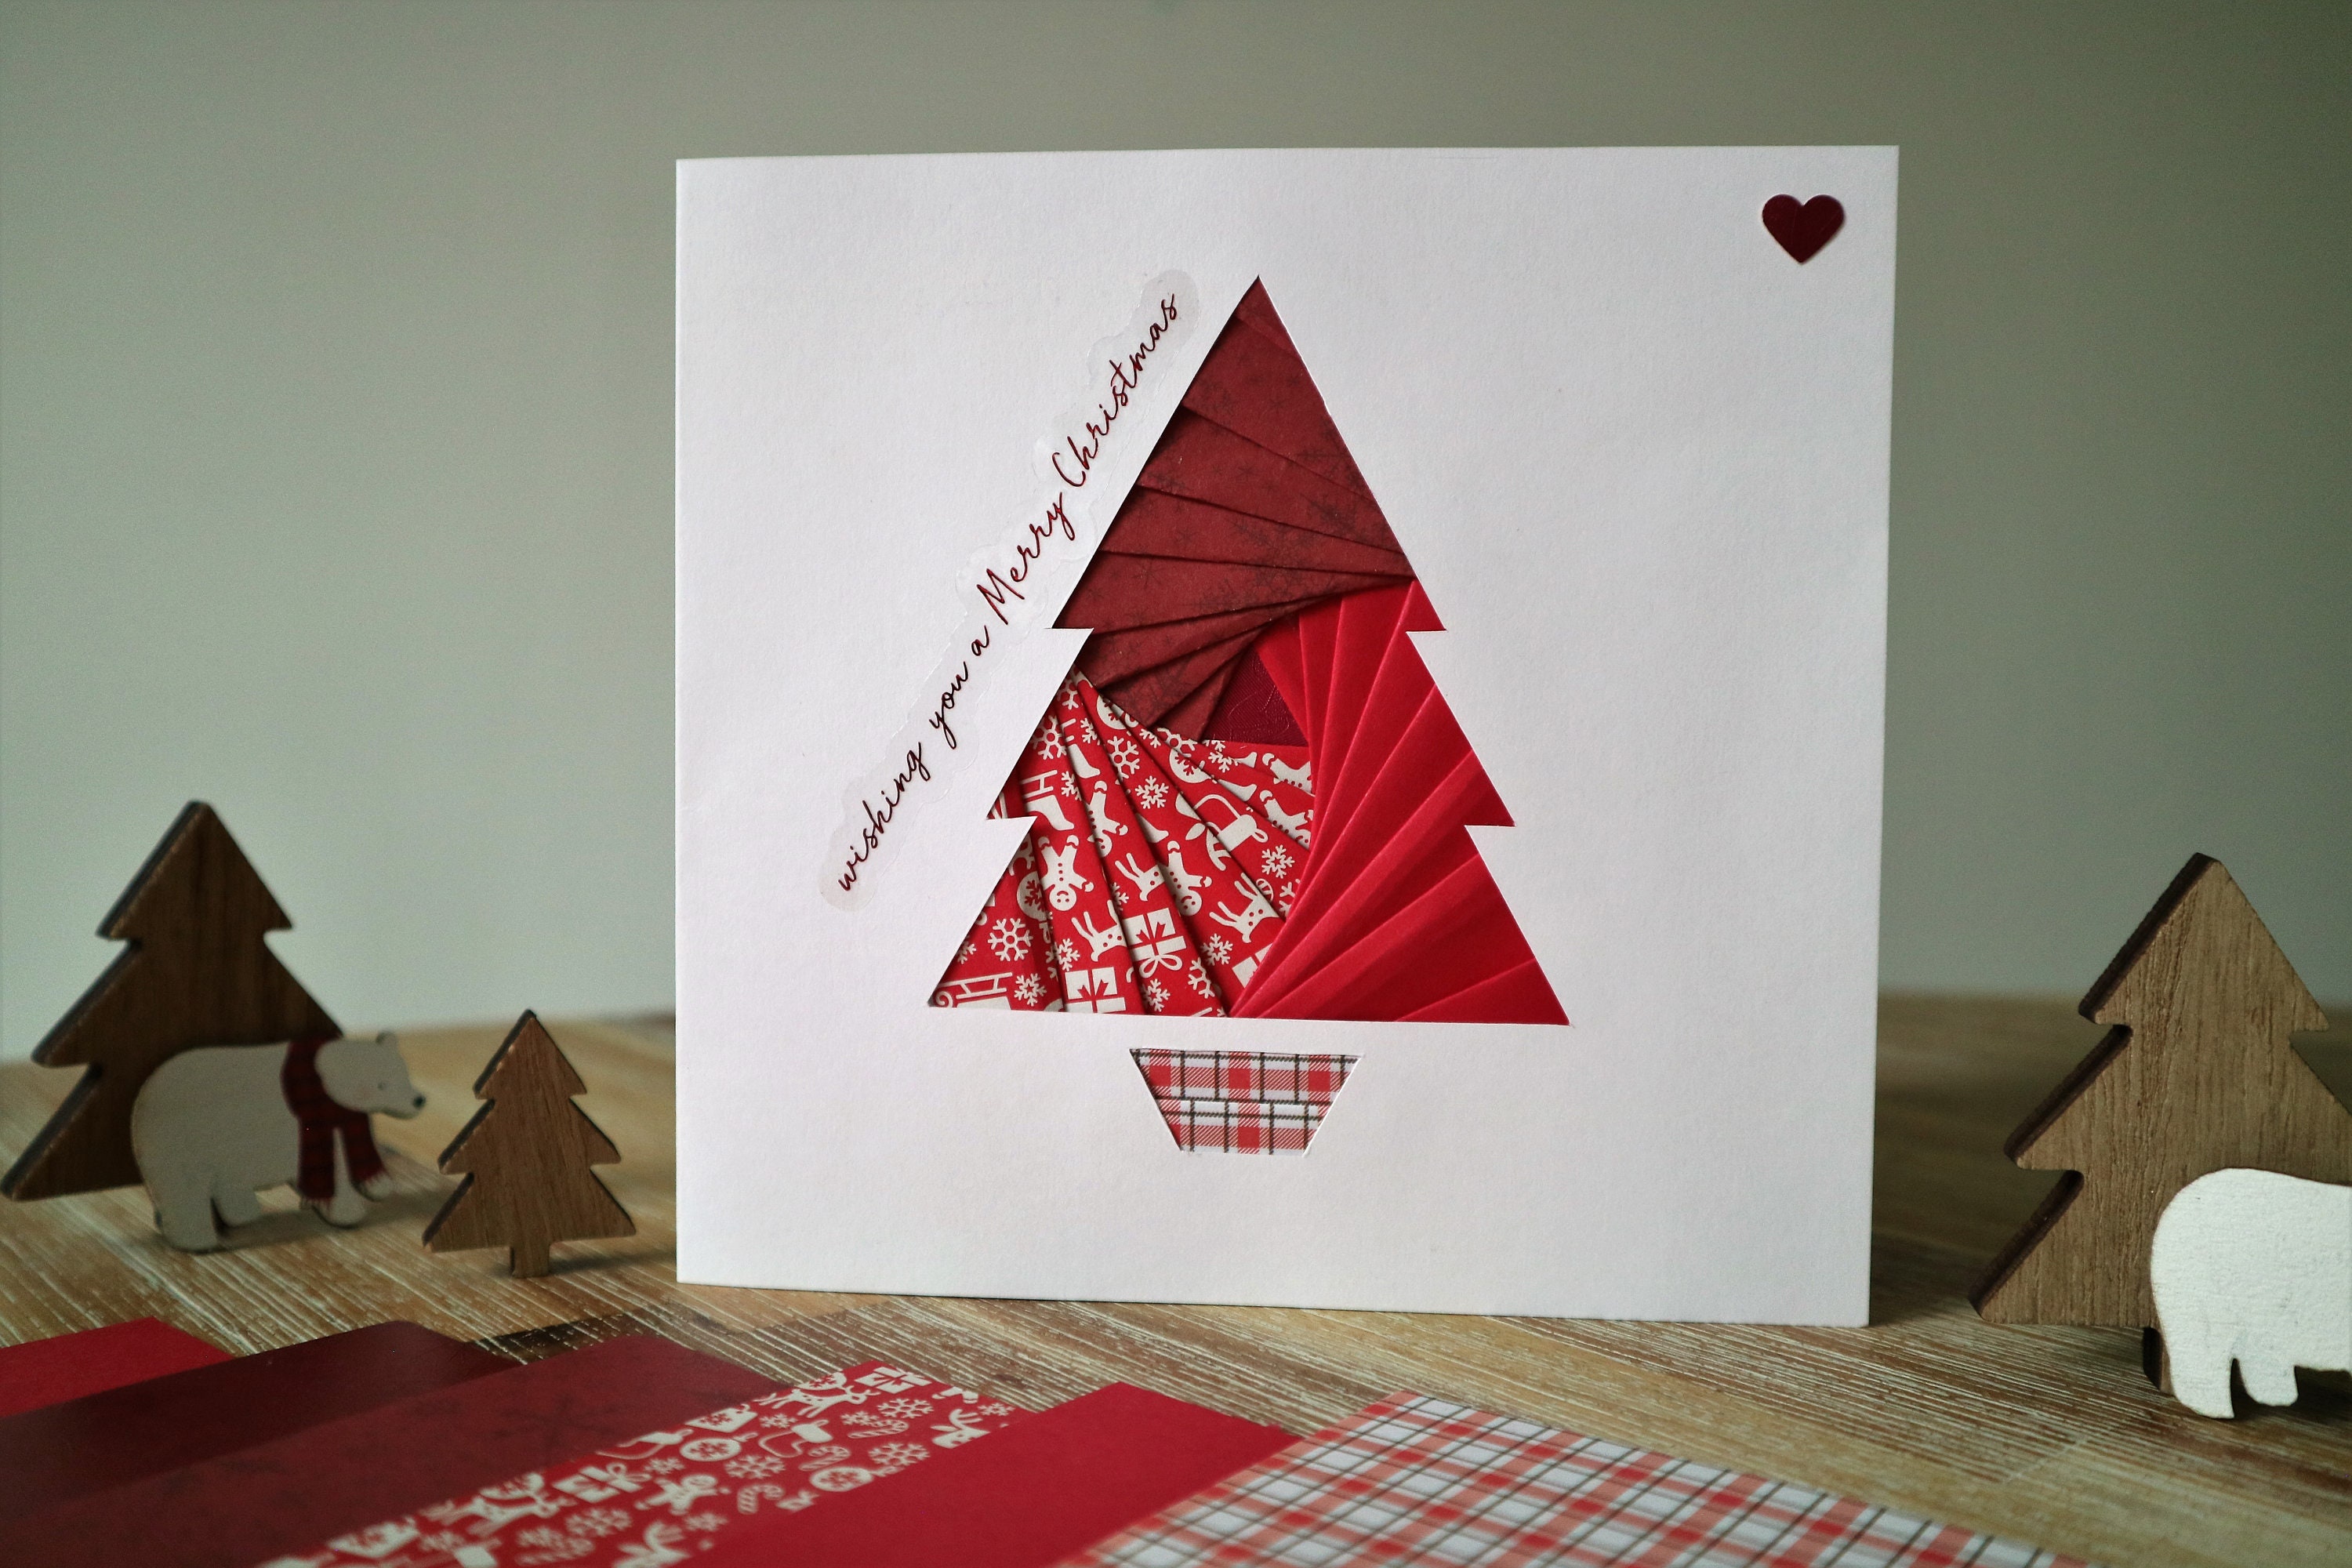
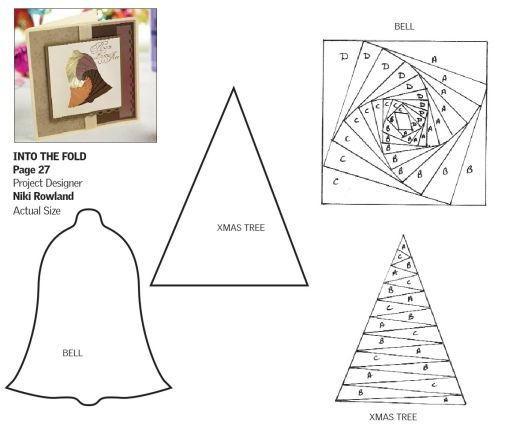
* Christmas Tree: A classic choice. These templates often use three or four different shades of green to create depth. The "iris" or center can be filled with a yellow or gold paper to represent a star or a brown piece for the trunk.
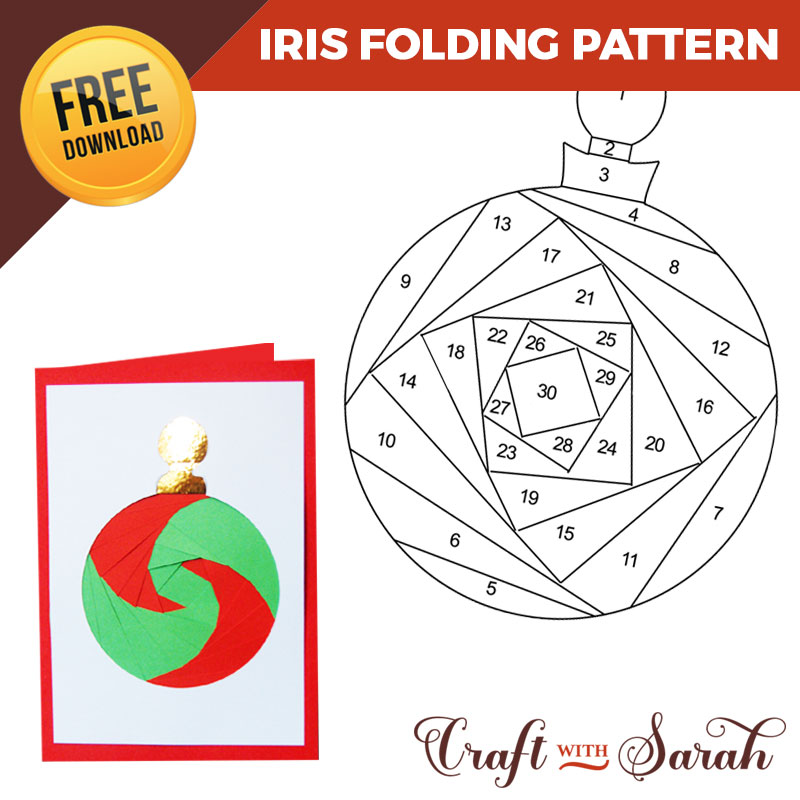
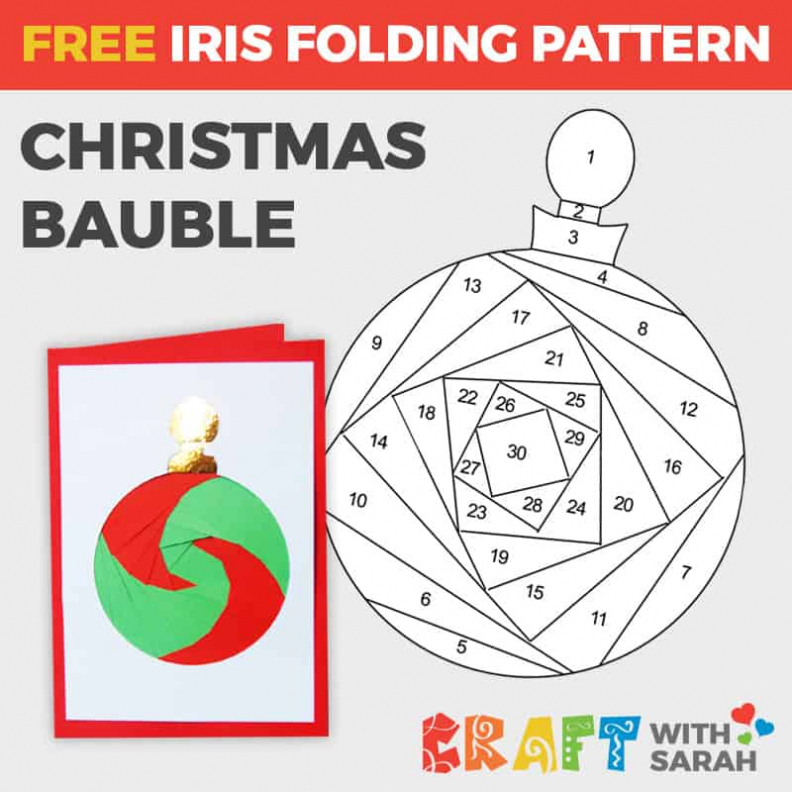
* Christmas Bauble: A simple circle or teardrop shape makes this an excellent first project. You can experiment with bold, festive papers, metallic strips, or even holographic paper for the iris to make your ornament sparkle.
* Star: A five-pointed star is another holiday staple. The sharp points require careful placement of the paper strips, but the final geometric effect is stunning. Gold and silver papers are a natural fit for this design.

Festive Winter Characters
For a more whimsical and playful card, character-based templates are a wonderful option.
* Snowman: These patterns typically involve two or three circular sections. You'll primarily use white or iridescent paper for the body, with a pop of color for a scarf and a small piece of orange for the carrot nose in the center.
* Reindeer: A reindeer head or silhouette is a charming design. Use shades of brown paper for the face and consider a bright red glitter paper for the "iris" to create a Rudolph-inspired look.
* Angel: An angel template often combines a triangular shape for the dress with smaller sections for the wings. Soft blues, whites, and metallic silvers and golds create a beautiful, ethereal effect.

Simple Geometric Designs
If you prefer a more modern or elegant aesthetic, geometric patterns are a fantastic choice.
* Wreath: A circular or doughnut-shaped template creates a lovely wreath. Layering different shades of green paper gives a realistic foliage effect, and a small red bow can be added as an embellishment after the iris folding is complete.
* Snowflake: While they can look complex, many snowflake templates are based on a simple hexagon. Using shades of blue, silver, and white paper will result in a frosty, beautiful design perfect for a "Happy Holidays" or "Winter Greetings" card.
Tips and Tricks for Perfect Iris Folded Cards
A few simple tips can elevate your cards from handmade to handcrafted masterpieces.
Choosing Color Palettes
Think about the overall mood you want to create. For a traditional feel, stick to reds, greens, and golds. For a modern winter wonderland theme, try a palette of icy blues, silver, and crisp white. Don't be afraid to use a single bold accent color to make your design pop.
Paper Selection Secrets
The paper you choose has a huge impact. Thin paper, like that from magazines or origami packs, is much easier to fold and results in less bulk on the back of your card. Using a mix of solid colors and subtle patterns can add wonderful texture. Upcycling old Christmas wrapping paper is not only eco-friendly but also ensures your card perfectly matches the holiday theme.
Finishing Touches
The iris folding is your focal point, but don't forget the details!
* Embellishments: A small gemstone, a sprinkle of glitter, or a tiny ribbon bow can add a perfect final touch.
* Backing Paper: Always cover the back of your work with a clean piece of paper or card. This hides the tape and gives your card a professional finish.
* Sentiments: Use a rubber stamp or a beautiful pen to add a holiday greeting like "Merry Christmas" or "Season's Greetings" below your design.
Common Mistakes to Avoid
- Visible Tape: Be careful that your tape doesn't peek through the aperture from the front. Always secure the strips well away from the inner window.
- Thick Paper: Using heavy cardstock for the strips will create too much bulk and make folding difficult. Stick to lighter-weight papers.
- Incorrect Alignment: Ensure your folded edge is always placed directly on the line indicated by the pattern. This precision is what creates the sharp, spiraling effect.
Beyond Cards: Other Christmas Crafts with Iris Folding
Your Iris Folding Christmas Cards Templates are more versatile than you might think! Once you've mastered the technique, you can adapt it for a variety of other festive projects.
- Gift Tags: Scale down a simple template like a star or bauble and create a set of beautiful, handmade gift tags. Just punch a hole at the top and add a ribbon.
- Tree Ornaments: Complete an iris folding design on a piece of sturdy cardstock. Cut it out, leaving a small border. Glue an identical piece of cardstock to the back to hide the tape, add a loop of string, and you have a unique, lightweight ornament for your tree.
- Decorated Gift Boxes: Create a larger iris folding design and mount it on the lid of a plain gift box for a truly special and personalized presentation.
- Holiday Bunting: Make several iris folding shapes (like Christmas trees or stars) and string them together with festive ribbon to create a beautiful garland for your mantle or wall.
Conclusion
Iris folding is a delightful and rewarding craft that allows anyone to create stunning, professional-looking holiday projects. With the help of clear and accessible Iris Folding Christmas Cards Templates, what appears to be a complex design becomes a simple, step-by-step process of layering colored paper. It's a technique that combines the joy of color and pattern with the satisfaction of creating something beautiful by hand.
From classic Christmas trees and sparkling ornaments to whimsical snowmen and elegant snowflakes, the possibilities are limited only by your imagination. By choosing your papers carefully, following the numbered patterns, and adding a few personal finishing touches, you can craft cards and decorations that are truly one-of-a-kind.
This holiday season, set aside some time to explore the meditative art of iris folding. It's the perfect way to unwind, use up those pretty paper scraps you've been saving, and create heartfelt greetings that your loved ones will not only admire but treasure as keepsakes for years to come.
0 Response to "Stunning Iris Folding Christmas Cards Templates"
Posting Komentar